
Selfie smile anxiety is a psychological phenomenon where individuals avoid open-mouth expressions due to perceived dental imperfections.
2020 data indicates that while 48% of people view the smile as a photo's most critical feature, 58% hide their teeth due to discoloration.
This guide outlines how to combine clinical whitening protocols with camera optics techniques to restore photo confidence.
If you want to stop hiding your smile in selfies, you are not being vain. Something just feels off.
In our analysis of 50,000+ customer feedback logs at SNOW, the phrase 'I smile differently on camera' appears in 65% of sensitivity queries, indicating a clear gap between real-life confidence and digital self-perception.
Stains, uneven natural teeth, or even missing teeth can interrupt a genuine smile. This guide helps you smile naturally again without chasing unrealistic perfection.
Key Takeaways
-
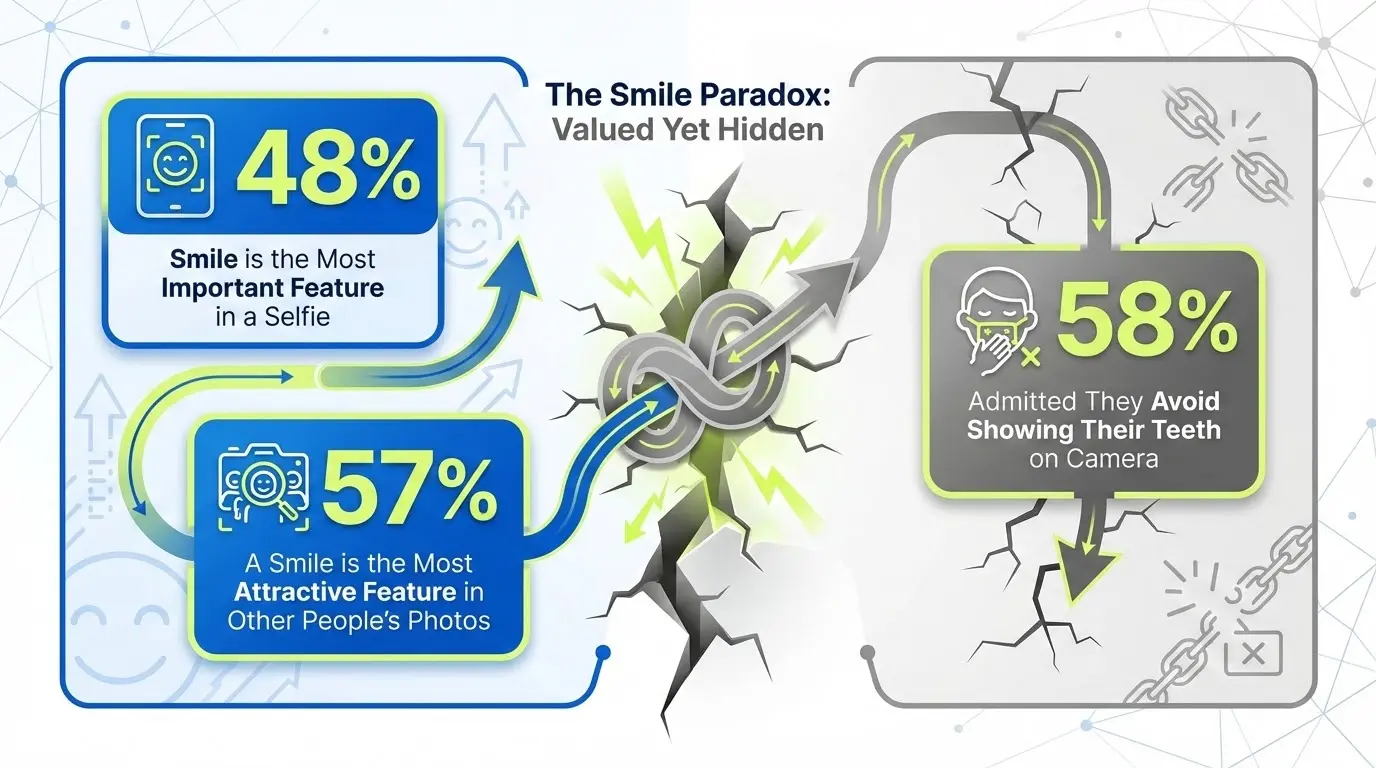
Open-smile selfies matter: in a 2020 Australian survey, 48% said the smile is the most important selfie feature and 57% found it most appealing in others, yet 58% still avoided showing teeth, often due to appearance worries.
-
Tooth color is a big reason people hide their teeth: about one-third in that survey avoided tooth-showing smiles because they felt uncomfortable with how their teeth looked, particularly discoloration and staining.
-
Clinical trials show that safe whitening can brighten teeth and, in the short term, reduce the psychological and social burden people feel about their smile—helping you feel “safer” showing teeth in selfies.
-
Results aren’t magic or permanent: color can slowly relapse over months, and expectations strongly shape how happy you feel with whitening, so aim for “brighter, not blinding” and plan for maintenance.
-
Pair whitening with smart selfie habits—soft lighting, better angles, and gradual practice—to confidently move from closed-mouth selfies to natural, teeth-showing smiles.
Why Do 58% of People Hide Their Smiles in Photos?
A 2020 Australian survey revealed something interesting.
-
48% of people said the smile is the most important feature in a selfie.
-
57% said a smile is the most attractive feature in other people’s photos.
-
Yet 58% admitted they avoid showing their teeth on camera.
That gap matters.
About one-third said they felt uncomfortable with how their natural teeth looked. The top reason was discoloration. Not dramatic cosmetic dentistry issues. Not major damage. Just tooth color.
On platforms like TikTok, Instagram, and dating apps, your face is often inches from the camera. Smartphone lenses utilize wide-angle optics that distort facial proportions.
A 2024 study on selfie optics confirmed that photos taken at an 8-inch distance cause midface vertical stretching of 12-19%, artificially enlarging the appearance of the front teeth and gums.
This distortion, combined with high-contrast ring lighting that emphasizes enamel texture, creates a 'hyper-real' image that highlights minor discoloration invisible to the naked eye.
So people adapt.
They smile with their mouth closed. They tilt their head. They crop their face. They scroll through old pictures and notice how often they hide. Over time, hiding your smile becomes automatic.
This is not about vanity. It is about perception and confidence.
Smile confidence affects how you show up in social settings, work events, and daily life. A genuine smile signals warmth and connection. When you stop hiding your smile, you often regain confidence beyond photos.
Of course, if concerns involve jaw pain, missing teeth, bone loss, or other oral health issues, a dentist should evaluate that first. Professional teeth care protects both oral health and overall health.
But for most people, it comes down to color.
If you want to stop hiding your smile in selfies, the first step is understanding why you started. The second is knowing that small changes can help you smile naturally again.
The Emotional Cost of a Closed-Mouth Smile
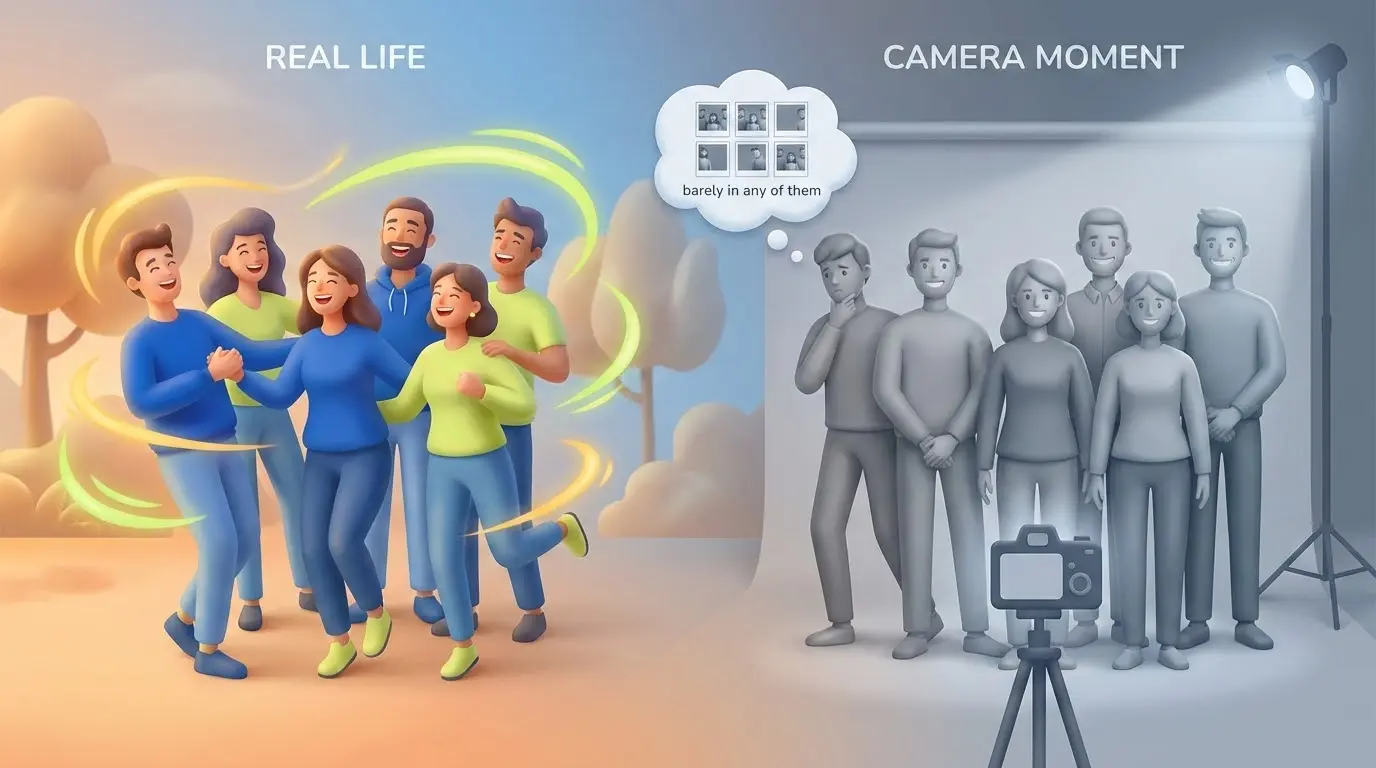
Picture this. It’s your best friend’s birthday. The group pulls out their phones for photos. Instantly, you step slightly back. When someone asks you to take the picture instead, you feel relieved. Later, scrolling through the night, you realize you are barely in any of them.
We hear this story all the time at SNOW. Thousands of people tell us they laugh freely in real life, but freeze when the camera flips on. Over time, that habit grows. You turn your mouth away. You cover your teeth when you laugh. You ask to be untagged.
It seems small, but it adds up.
Research shows that even subtle, genuine smiles increase how approachable and attractive someone appears. Smiling also triggers the release of dopamine and endorphins, chemicals that support mood and overall well-being. When you hold back your smile, you are not just hiding your teeth. You are holding back energy, warmth, and presence.
At SNOW, we believe confidence is part of oral care. Whitening is not about perfection. It is about removing the small barriers that keep you from showing up fully.
Explore the SNOW Whitening Collection
The goal is not flawless photos. It is being in the memories without hesitation.
Why Tooth Color Makes You Hide in Photos
Some people feel fine about their smile in real life, but something changes when they see it in photos. Dentists hear this, too. Many patients say the first time they truly noticed discoloration was in a tagged picture, not in the mirror.
Here is why that happens.
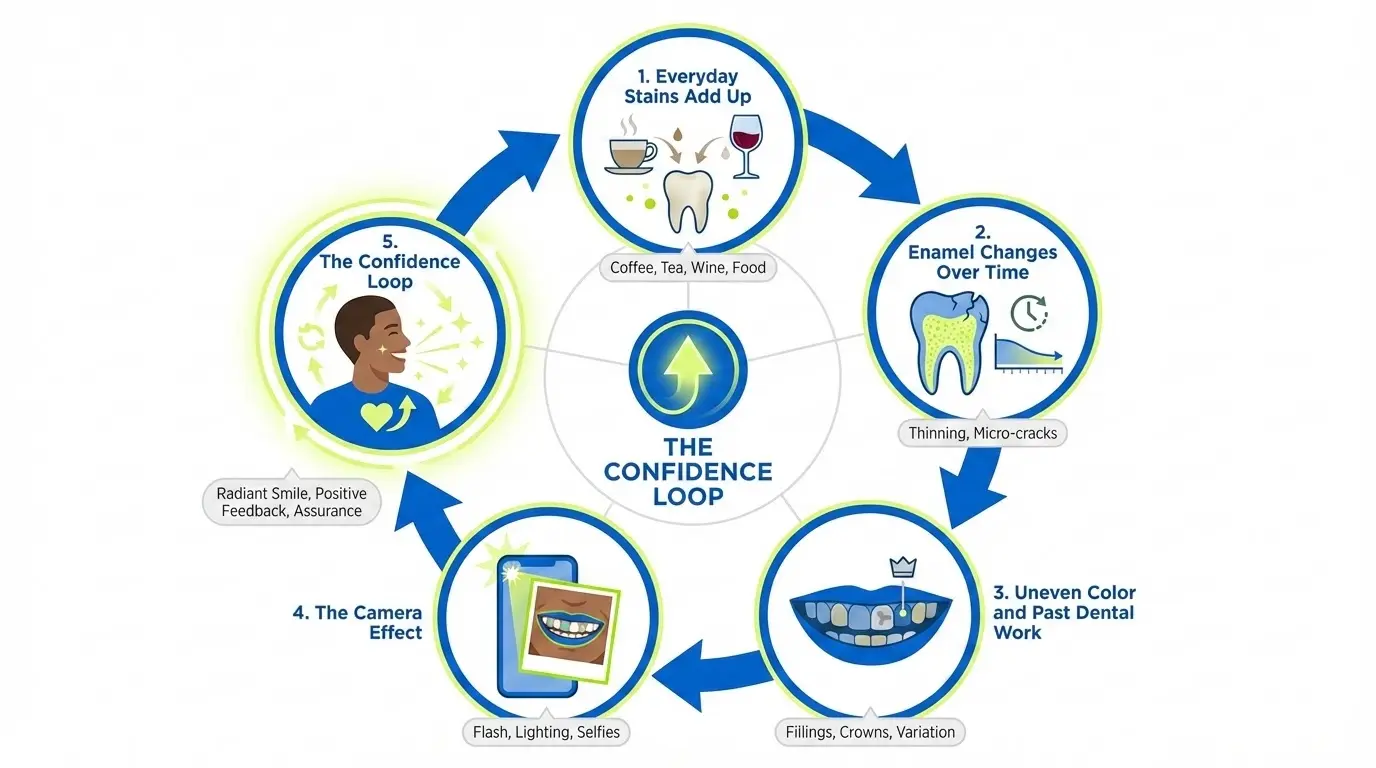
1. Everyday Stains Add Up
Coffee before work. Tea at night. Red wine on weekends.
These daily habits slowly leave surface stains on natural teeth. The change is gradual, which is why most people do not notice it right away. Then a bright camera flash or outdoor lighting hits, and suddenly the tone looks darker than expected in photos.
A UK poll reported by the Oral Health Foundation found that only 29% of people would pose with an open smile, and 33% cited discoloured teeth as the main reason for holding back. Dentists consistently reassure patients that this type of staining is common and usually manageable.
2. Enamel Changes Over Time
Enamel naturally thins as we age. When that happens, the warmer dentin underneath becomes more visible.
Enamel thinning is a natural biological process where the outer white layer wears down, revealing the yellow dentin underneath.
Even patients with robust oral hygiene experience dentin visibility as they age, increasing the perception of yellowing in high-resolution photos.
In photos, however, contrast is amplified. What looks subtle in person can appear more yellow or uneven under strong lighting. That visual exaggeration often leads people to feel uncomfortable or overly critical when reviewing pictures.
3. Uneven Color and Past Dental Work
Some people notice slightly darker canines. Others see faint white spots from braces, minor bonding, or a crown that reflects light differently than surrounding natural teeth. A single implant or restoration can appear brighter or flatter under different lighting conditions.
In cosmetic dentistry consultations, dentists often explain that these differences are minor and common. But in close-up photos, uneven color can become the only thing a person notices. That focus grows with repeated exposure to filtered and edited images online.
4. The Camera Effect
Here is what makes selfies especially unforgiving. Your phone camera, held at arm’s length, subtly distorts facial proportions.
Research published in 2024 found that at about 8 inches distance, midface vertical stretching can reach 12 to 19 percent depending on camera setup. Combine that with overhead lighting or flash, and shadows around the mouth deepen. Even mild yellowing can appear more obvious on-screen than in your bathroom mirror.
In real life, your smile is dynamic and natural. In photos, it freezes. That still frame removes warmth and movement, making small color variations feel larger than they actually are.
5. The Confidence Loop
Once you notice something in photos, it becomes hard to ignore. You begin closing your mouth in group shots. You step behind the camera. You crop yourself out.
Over time, the habit of hiding matters more than the original concern.
At SNOW, we see this every day. Most of the time, the issue is not severe dental health problems. It is perception amplified by lighting, comparison, and repetition. Understanding that is often the first step toward feeling more comfortable when the camera turns on.
How Whitening Can Help You Stop Hiding (Backed by Science)
Whitening is not about chasing extreme shades. It is about correcting the yellowing and stains that make you hesitate before smiling in photos. When tooth color improves, confidence often follows.
What the Research Shows
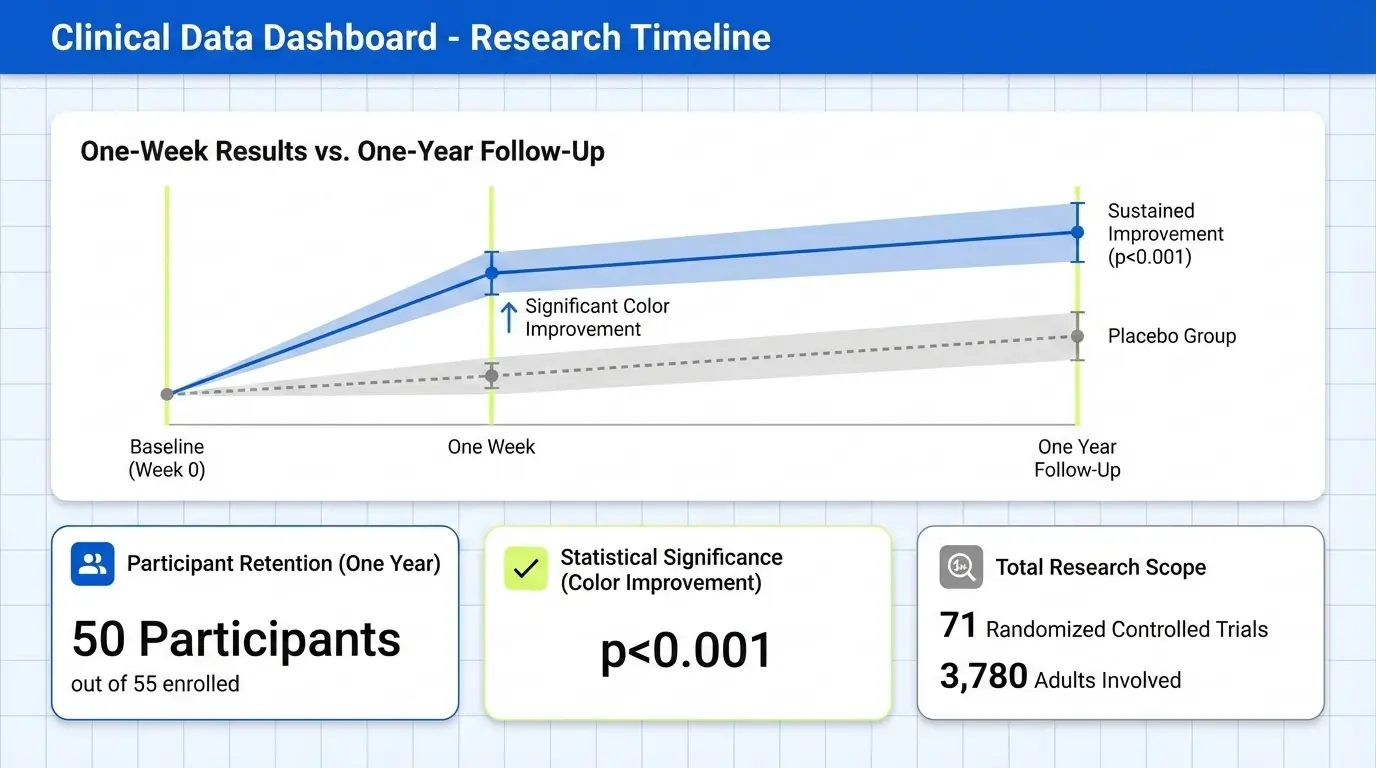
A 2025 randomized, double-blind, placebo-controlled trial followed 50 participants over one year.
-
One week after treatment, the active whitening group showed significantly greater color improvement than placebo (p<0.001).
-
Participants also reported fewer short-term psychological and social concerns about their smile.
At the one-year mark, some color relapse occurred. As the teeth darkened slightly again, concerns about confidence increased. Researchers noted that expectations strongly shaped satisfaction.
A Cochrane Review analyzing 71 randomized controlled trials involving 3,780 adults confirmed that home whitening products can produce measurable shade changes compared with placebo. The most common side effects were temporary tooth sensitivity and mild gum irritation, which typically resolved after stopping use.
What This Means for You
Whitening can:
-
Reduce visible staining
-
Lower self-consciousness in photos
-
Help you feel more comfortable smiling openly
But results are not permanent. Maintenance and realistic expectations matter.
If sensitivity has held you back before, the SNOW Diamond Teeth Whitening Kit focuses on controlled exposure and comfort-support ingredients designed to help you stay consistent.
Get The SNOW Diamond Teeth Whitening Kit
Whitening Options: From Quick Fixes to Long-Term Plans
The SNOW Diamond Teeth Whitening Kit is designed for people who want a visible change without turning whitening into a stressful process. It combines peroxide-based treatments with comfort-support ingredients so you can stay consistent. Sessions are short enough to fit into real life, whether you are getting ready for work or taking photographs with friends. Many users notice a shade difference within the first week when used as directed.
Get The SNOW Diamond Teeth Whitening Kit
That said, whitening is not one-size-fits-all. If you are addressing discoloration, here are your main options and what to realistically expect.
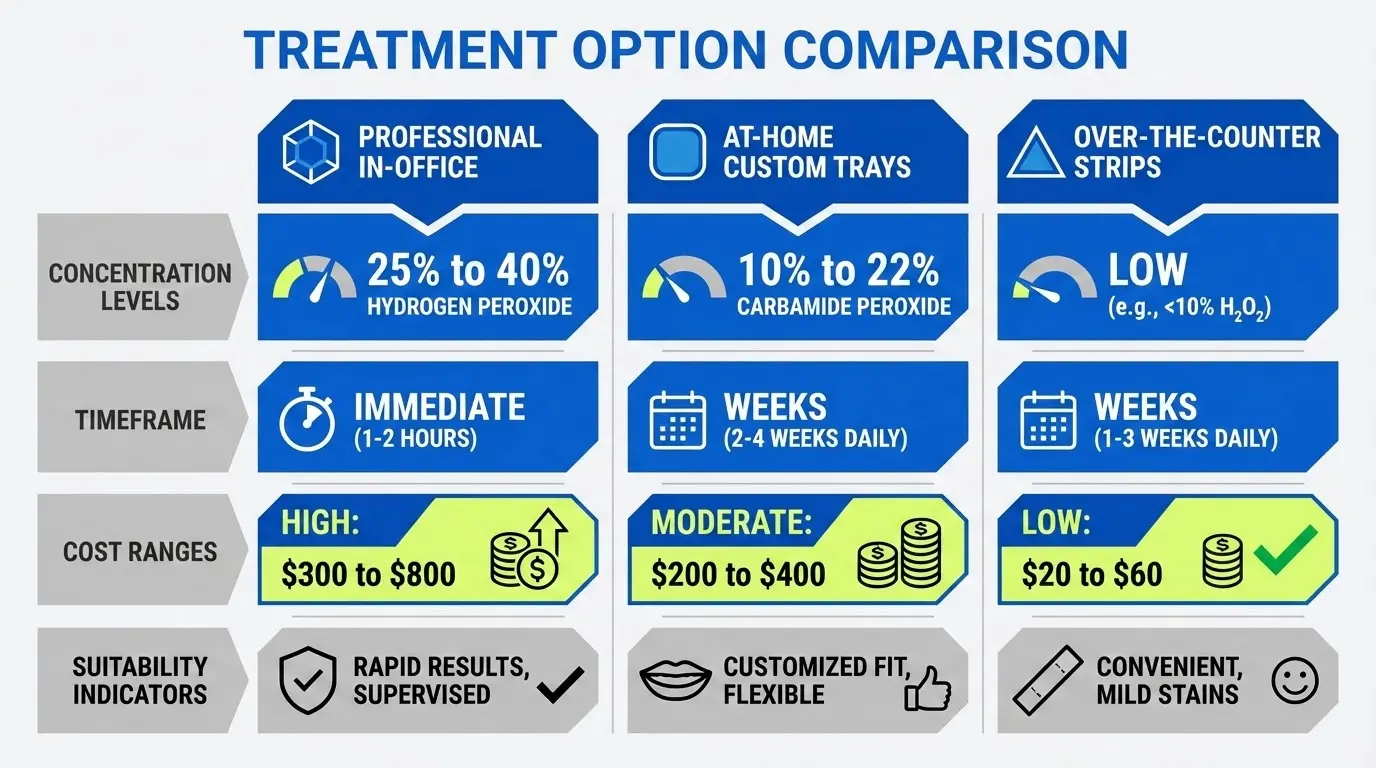
1. In-Office Professional Whitening
These treatments occur during a dental appointment and use higher concentrations of hydrogen peroxide, often 25 to 40 percent. Some offices pair the gel with light activation.
-
Results can happen in one appointment.
-
You may see a significant improvement in shade quickly.
-
The risk of sensitivity is higher due to concentration.
-
Cost typically ranges from $300 to $800 or more.
This route works well if you want fast change before an event. A dentist will examine your enamel, alignment, gums, and any gaps before treatment. If you have restorations or uneven discoloration, a consultation helps shape a safe plan. Sensitivity can happen afterward, so follow post-treatment instructions and listen to your body.
2. Dentist-Supervised At-Home Trays
Custom trays use 10 to 22 percent carbamide peroxide and are worn daily for one to two weeks.
-
More gradual shade improvement.
-
Moderate sensitivity risk.
-
Greater control over pacing.
-
Costs usually range from $200 to $400.
These treatments are ideal if you want professional guidance but prefer to relax at home. A dentist adjusts wear time if sensitivity happens. Consistent use, brushing, and flossing habits make a difference in results. This option is often supportive for people who want noticeable change without the intensity of a single high-dose appointment.
3. Over-The-Counter Whitening Products
Strips, pens, and LED kits use lower peroxide levels and are widely available.
-
Results take 2 to 4 weeks.
-
Lower sensitivity risk for most people.
-
Budget-friendly.
-
Good for mild discoloration.
They can lighten teeth by a few shades when used properly. If you brush twice daily, floss regularly, and avoid staining drinks, the difference becomes more visible in the mirror. For deeper discoloration or complex alignment concerns, professional advice is helpful.
How to Choose
Ask yourself:
-
How fast do I want results?
-
What is my tolerance for sensitivity?
-
Do I need a consultation first?
-
Am I preparing for photographs or long-term change?
Whitening treatments can improve tooth shade, but they do not fix alignment, gaps, or structural issues. If those concerns exist, cosmetic dentistry may be part of the conversation.
Whatever route you choose, the goal is simple. Reduce discoloration, lower stress about your smile, and create space to smile naturally in front of the mirror, your friends, and your camera.
Safety, Sensitivity, and Setting Realistic Expectations
Whitening is generally safe when used correctly, but sensitivity and mild gum irritation are common side effects. Research reviews, including large analyses of randomized trials, show that these reactions are usually temporary. They tend to appear more often with higher peroxide concentrations and typically resolve within a few days after stopping treatment.
A 2025 meta-analysis confirmed an important finding: at-home products with higher hydrogen peroxide or carbamide peroxide levels are more likely to cause sensitivity than lower-strength options. If your teeth are already sensitive, starting with a lower concentration and spacing sessions apart is the smarter move. Whitening should feel manageable, not painful.
How to Reduce Sensitivity
-
Use a desensitizing toothpaste with potassium nitrate for 1 to 2 weeks before starting.
-
Do not overload trays with gel. Extra product increases gum irritation.
-
Space out sessions if discomfort begins. Daily use is not mandatory.
-
Avoid whitening if you have untreated cavities, cracks, or active gum disease.
-
See your dentist if sensitivity persists or if you have crowns, veneers, or fillings.
It is also important to remember that restorations do not whiten like natural teeth. If you have visible crowns or bonding, whitening may create uneven shade differences. A dentist can help you plan the right sequence to avoid mismatches.
Aim for brighter, not blinding. Over-whitening increases sensitivity risk and rarely improves satisfaction. Some shade relapse over months is normal. Gentle maintenance touch-ups work better than aggressive repeat treatments. The goal is comfort and confidence, not an artificial glow.
Selfie-Specific Tricks: Make Your Smile Look Better Instantly
Whitening takes time. But you can improve how your smile looks in photos today by adjusting how you use your camera. This is not about hiding flaws. It is about understanding how phones distort faces and working with that instead of fighting it.
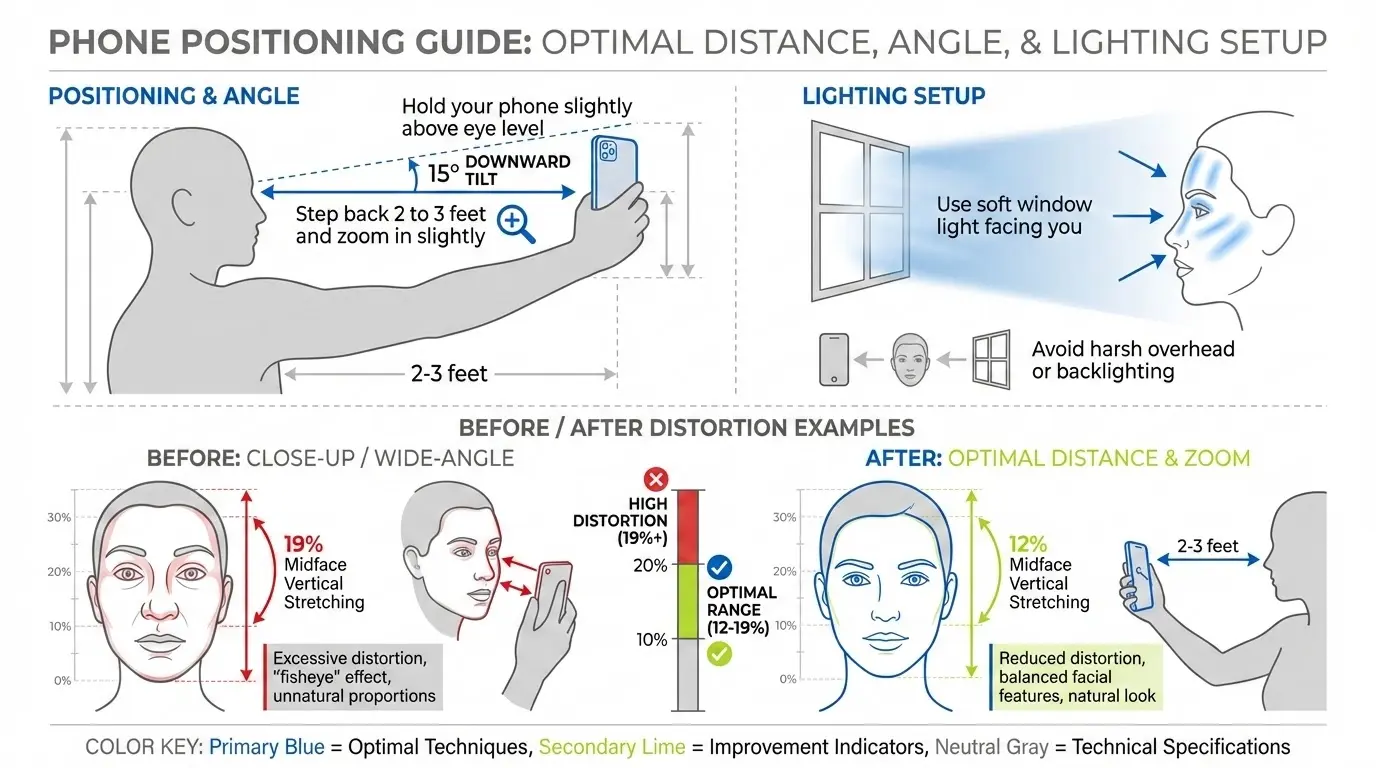
A 2024 study on selfie optics found that taking photos at about 8 inches can stretch the midface vertically by 12 to 19 percent. That slight distortion can make your mouth and teeth look more prominent than they do in real life or in the mirror. A small shift in distance and angle makes a noticeable difference.
Simple Adjustments That Work
-
Hold your phone slightly above eye level. This opens your expression and avoids upward distortion.
-
Step back 2 to 3 feet and zoom in slightly instead of shooting at arm’s length. Less distortion, more natural proportions.
-
Use soft window light facing you. Avoid harsh overhead lighting that deepens shadows around your mouth.
-
Relax your jaw and shoulders before smiling. Tension shows immediately in photos.
-
Turn your head slightly instead of facing the camera straight on. A small angle adds dimension.
Try this technique: think of something genuinely warm or funny before tapping the shutter. Let your eyes smile first. Then gently part your lips and show just your upper teeth. Practice in your front camera preview until it feels natural, not forced.
For one week, take 5 to 10 photos daily. Keep only the ones you like. Repeated exposure trains your brain to see your smile more accurately. Confidence grows from familiarity, not perfection.
From Closed-Mouth to Confident: A 30-Day Smile Confidence Plan
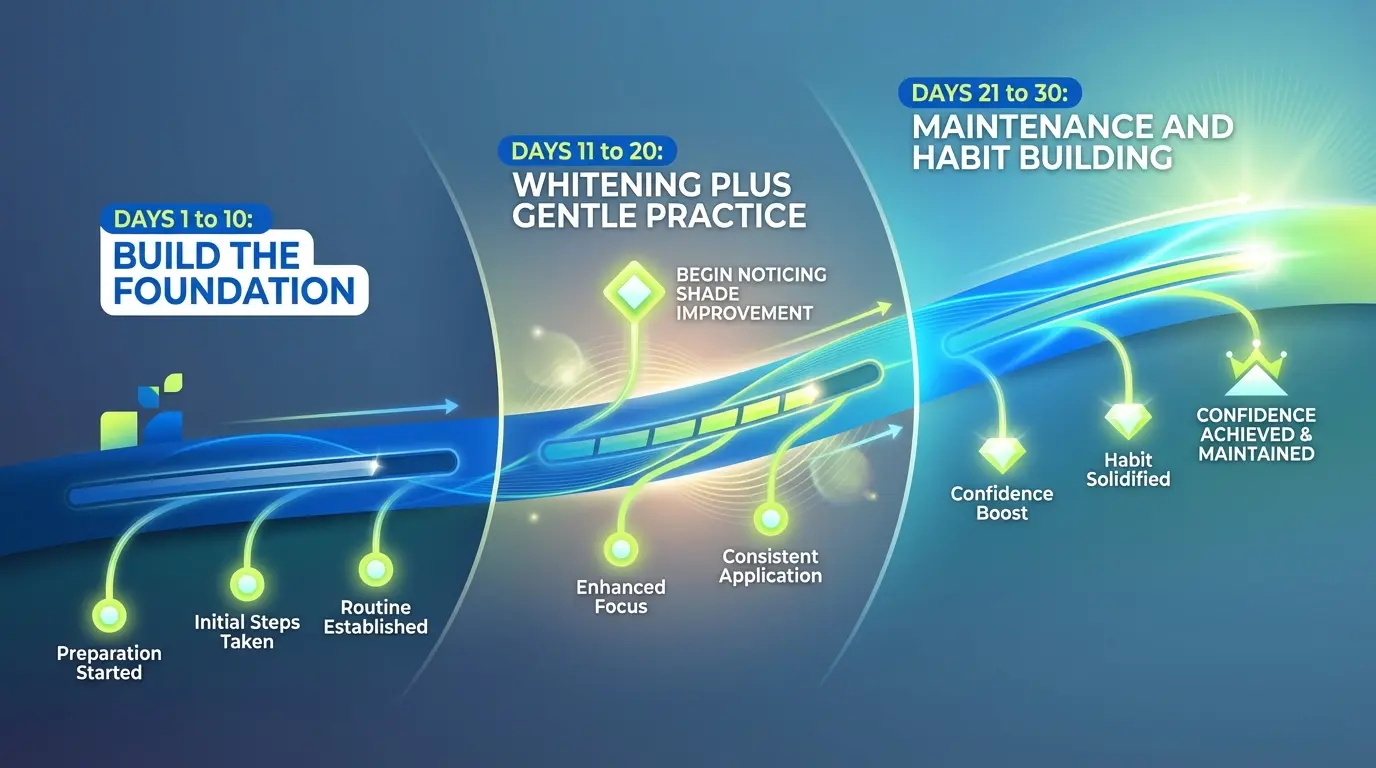
Changing how you feel about your smile does not happen overnight. This 30 day roadmap blends oral health basics, gentle whitening habits, and intentional practice so you can move from mouth closed avoidance to relaxed, open smiles in photos. It is not about perfection. It is about steady progress.
Days 1 to 10: Build the Foundation
Start with the basics, so everything else works better.
If it has been 6 to 12 months since your last dental cleaning, book one. Professional cleaning removes surface stains and provides whitening products with a clean starting point. Your dentist can also check for cavities, gum sensitivity, or alignment concerns that should be handled first.
At home:
-
Rinse with water after coffee, tea, or red wine
-
Brush twice daily and floss consistently
-
Add something supportive like the SNOW Whitening Toothpaste to gently maintain brightness while you build momentum
Take simple “before” selfies in the same lighting. These are just for you. They help you notice real improvement that your brain might otherwise overlook.
Get The SNOW Whitening Toothpaste
Days 11 to 20 Whitening Plus Gentle Practice
If you choose to whiten, begin now. Follow instructions carefully. Trying to speed things up often leads to increased sensitivity rather than better results.
Combine whitening with daily smile practice. Spend two to three minutes in front of a mirror or your phone camera. Start with a small tooth showing a smile. Pay attention to angles that feel natural.
If you want a system designed for visible improvement with comfort in mind, the SNOW Diamond Teeth Whitening Kit offers a balanced approach that supports consistency without overwhelming your teeth.
Get The SNOW Diamond Teeth Whitening Kit
If sensitivity appears, space out sessions. Mild discomfort can happen. Sharp or lingering pain means pause and adjust.
Take a few test selfies each day. Keep the ones you like. Delete the rest without overthinking.
Days 21 to 30 Maintenance and Habit Building
By now, you should begin noticing shade improvement. Shift into maintenance. Space whitening sessions further apart. Keep brushing and flossing daily. Rinse after staining drinks to protect your results.
This is the stage where confidence grows. Share an open smile photo with supportive friends. Post something low-pressure. Notice how it feels. The goal is not perfection. It is participation.
At the end of 30 days, reflect on the change. Maybe you no longer avoid group photos. Maybe you laugh freely without covering your mouth. Those are real wins.
Confidence builds from repetition and small actions. A brighter smile simply makes it easier to show up as yourself.
When to Talk to a Dentist Instead of Just Editing Your Photos
Filters, angles, and good lighting can improve photos. But they cannot fix structural dental issues. If you constantly edit your smile in old and new pictures, it may be time to address the root cause rather than masking it.
Schedule a dental consultation if you notice:
-
Persistent tooth pain or sensitivity that does not improve
-
Visible cracks, chips, or broken edges
-
One tooth that looks much darker than the others
-
Wobbly teeth, gaps from missing teeth, or signs of bone loss in the gums
-
Ongoing jaw pain or discomfort when chewing
These are not cosmetic details. They can signal underlying health concerns that whitening alone cannot resolve.
For issues beyond color, cosmetic dentistry offers practical solutions. Bonding can smooth small chips. Crowns can restore damaged teeth. Dental implants can replace missing teeth while preserving bone structure and bite stability. These treatments restore both function and appearance.
If you are obsessively editing photos, avoiding cameras completely, or feeling ongoing stress about how you look, consider broader support. Sometimes, confidence struggles are not only about teeth. Speaking with a mental health professional can be just as valuable as visiting a dentist.
Think of a dental consultation as a planning conversation, not a judgment. Dentists regularly work with patients who bring specific concerns or even screenshots of photos they dislike. You do not have to commit to treatment immediately. The first step is simply understanding your options so you can make informed decisions.
Final Thoughts
You do not need perfect teeth to deserve a visible, genuine smile. Most people who hide their teeth in photos are reacting to small details that feel bigger on camera than they are in real life.
Tooth color can improve. Confidence can be rebuilt. And habits can change.
Whether you choose professional treatment, at-home whitening, or simply better lighting and angles, the goal is not perfection. It is participation. It is showing up in memories instead of standing behind the camera. It is smiling without overthinking it.
If tooth color is the barrier holding you back, start with a safe, sensitivity-aware system designed for real-life use. Explore the SNOW Whitening Collection and choose the option that fits your comfort level and routine.
Brighter teeth can help. But the real win is this: you stop hiding, and you start smiling again.
Shop the SNOW Whitening Collection
FAQs
Fast answers to your top smile and whitening questions.
How long do teeth-whitening results really last for selfie-ready photos?
Noticeable brightening from professional or dentist-supervised whitening typically lasts several months. Clinical trial data show a measurable benefit persists for about 1 year after treatment, though most people notice gradual relapse as new stains accumulate. The difference between someone who maintains results for 6 months versus 18 months often comes down to lifestyle: frequent coffee, tea, red wine, or smoking shortens how long teeth stay bright, while good oral hygiene and occasional touch-ups extend results. A realistic pattern for many is one main whitening course followed by smaller maintenance sessions every few months, guided by a dentist.
Is it safe to use at-home whitening kits if I have sensitive teeth?
If you already experience sensitivity, consult your dentist before starting any whitening. Underlying issues like cavities, enamel erosion, or receding gums may need treatment first. For those cleared to proceed, lower-concentration products (such as 10% carbamide peroxide) used less frequently tend to be gentler. Applying desensitizing toothpaste for 1-2 weeks before and during whitening also helps. If you experience sharp pain or prolonged sensitivity that doesn’t resolve after stopping, seek professional evaluation rather than pushing through discomfort.
Can whitening fix white spots, gray teeth, or stains from childhood?
Surface stains and mild internal yellowing typically respond best to whitening. White spots from fluorosis or braces, and gray or brown teeth from trauma or tetracycline antibiotics, can be more resistant to standard bleaching. In these more complex cases, dentists may combine whitening with microabrasion, bonding, or veneers to achieve even color. If you have one or two very dark or mottled teeth, seek a personalized plan rather than repeatedly using over-the-counter products that may not address the underlying cause.
Will smiling more in selfies actually make me feel better about my smile?
Research on facial feedback and social perception suggests that smiling—even in subtle, genuine ways—can influence mood and how others respond to you. Many people report feeling less uncomfortable over time when they deliberately practice smiling in selfies, review the ones they like, and share a few with trusted friends. Behavioral practice combined with physical improvements (like whitening or dental care) tends to have the strongest impact on long-term confidence. You don’t have to love your smile immediately; tolerance often comes before enthusiasm.
What if I still hate my smile in photos after whitening?
First, check whether your expectations were realistic. Give yourself a few weeks to adjust to your new appearance—people often underestimate changes or fixate on remaining flaws initially. If tooth color is no longer your main concern, schedule a follow-up with your dentist to discuss other options like minor reshaping, bonding for chips, or alignment correction through clear aligners. Consider the role of self-image and social comparison: limiting time on accounts that trigger appearance anxiety, or talking to a therapist about body-image concerns, can help balance any further cosmetic work with mental-health strategies. Sometimes the smile itself isn’t the problem—it’s how you’ve learned to see it.


