
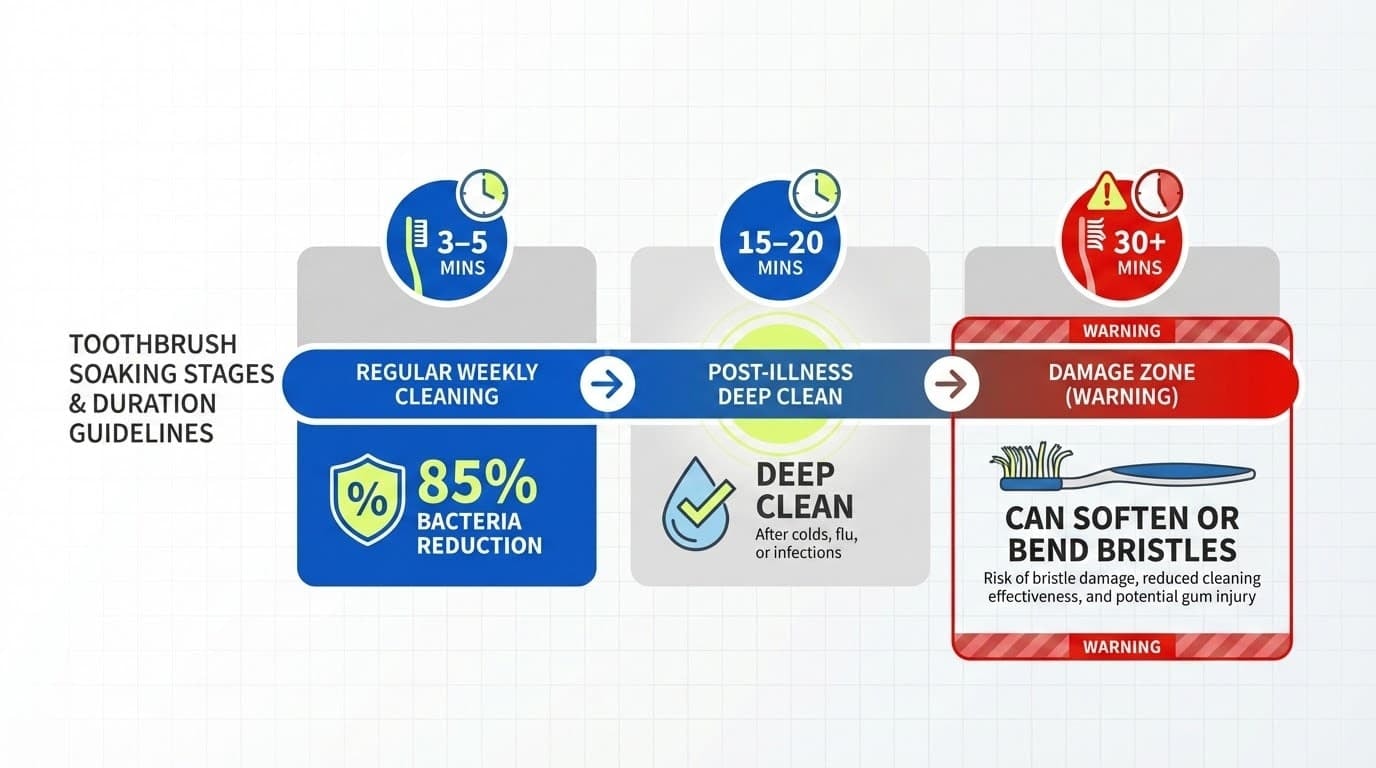
For effective disinfection, soak your toothbrush in 3% hydrogen peroxide for 3 to 5 minutes once a week.
This duration is sufficient to reduce bacterial load by 85% without damaging the nylon bristles. For deeper sanitization after illness, a 15–20 minute soak is recommended, but soaking longer than 30 minutes can degrade bristle integrity.
So how long should I soak my toothbrush in hydrogen peroxide to keep it truly clean?
This guide covers the science of toothbrush disinfection, including:
-
Is it safe to use hydrogen peroxide daily?
-
How does peroxide compare to UV sanitizers and vinegar?
-
What are the specific protocols for electric toothbrush heads?
-
How to manage disinfection for children and orthodontic appliances.
Key Takeaways
-
A 3–5-minute soak in 3% hydrogen peroxide is sufficient for everyday toothbrush disinfection, achieving 75–87% bacterial reduction in clinical studies. For near-complete microbial elimination, extend the soak to 15–20 minutes.
-
Soaking for longer than 20–30 minutes provides no additional disinfection benefit and can weaken toothbrush bristles, making them soft and less effective. Overnight soaking should always be avoided.
-
Hydrogen peroxide at 3% concentration is generally safe when you don’t swallow it and rinse your toothbrush thoroughly afterward. Pregnant individuals and those with known sensitivity should consult a dentist or consider alternatives like antibacterial mouthwash.
-
A simple weekly routine works well for most people: rinse the brush, soak for 3–5 minutes in fresh 3% hydrogen peroxide (or diluted 1:1 for sensitive users), rinse again, and let it air dry in an upright position.
-
Even with regular disinfection, the American Dental Association recommends replacing your manual toothbrush or electric toothbrush head every 3–4 months, or sooner if bristles fray or after recovering from illness.
Optimal Soaking Time for Toothbrush Disinfection with Hydrogen Peroxide
If you want to disinfect your toothbrush and kill harmful bacteria, soaking it in 3% hydrogen peroxide is a simple and effective method.
A standard 3 to 5-minute soak in 3% hydrogen peroxide is the optimal balance between efficacy and material safety.
Clinical studies indicate this exposure time reduces aerobic and anaerobic bacteria counts by approximately 85%, including common oral pathogens like Streptococcus mutans.
Limiting the soak to 5 minutes prevents the oxidation from softening the nylon bristles, which preserves the brush's mechanical ability to remove plaque.
In some instances, such as after a cold or flu or if you have a weak immune system, you can soak your brush longer. A 15 to 20-minute soak in hydrogen peroxide has been shown in studies to nearly eliminate bacteria from toothbrush heads. This deeper clean helps protect your oral health during recovery.
However, soaking your toothbrush in hydrogen peroxide for too long (over 30 minutes) can soften or bend the bristles, making the brush less effective. That’s why it's best to avoid over-soaking.
Stick to:
-
3–5 minutes for regular weekly cleaning
-
15–20 minutes after illness or high bacteria exposure
For best results, rinse your brush after soaking, let it air dry, and avoid storing it wet in a closed toothbrush holder. Whether you use a manual or electric toothbrush, this method helps keep your brush fresh and safe to use.
Is It Safe to Soak a Toothbrush in Hydrogen Peroxide?
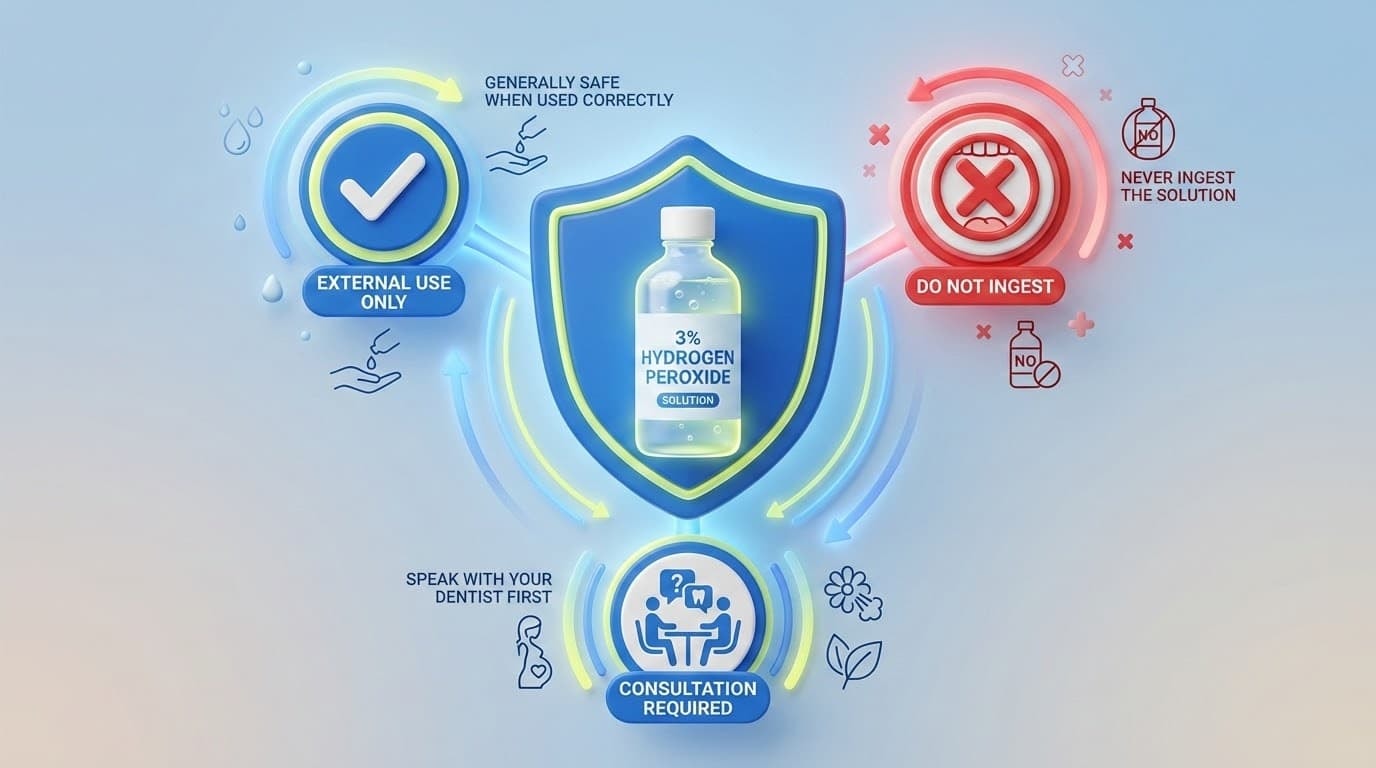
Yes, soaking your toothbrush in standard 3% hydrogen peroxide is generally safe when used correctly. This is the same over-the-counter solution found in most drugstores and is approved for oral use as a mild antiseptic.
Hydrogen peroxide works by releasing oxygen that breaks down the walls of harmful bacteria and viruses. Users must strictly apply hydrogen peroxide as an external disinfectant; never ingest the solution. Never swallow it, and always rinse your toothbrush thoroughly with water after soaking.
When used once a week for about 3 to 5 minutes, hydrogen peroxide carries minimal risk. Most people will not experience gum irritation or sensitivity at this concentration. However, stronger solutions above 74% can increase the chance of irritation, which is why 3% is the recommended option for home use.
If you're pregnant, have hydrogen peroxide allergies, or have active gum disease, speak with your dentist first. In these cases, safer options like diluted peroxide, alcohol-free antibacterial mouthwash, or denture cleaners may be better suited for toothbrush disinfection.
What Pathogens Are Eliminated by Disinfecting Your Toothbrush?
Keeping your toothbrush clean isn’t just about making it look fresh; it’s about protecting your health. While it may seem harmless, a used toothbrush can quickly become a breeding ground for bacteria, viruses, and even fungi.
Here’s why regular disinfection matters and how it supports your oral hygiene routine.
1. Toothbrushes Collect Harmful Bacteria Fast
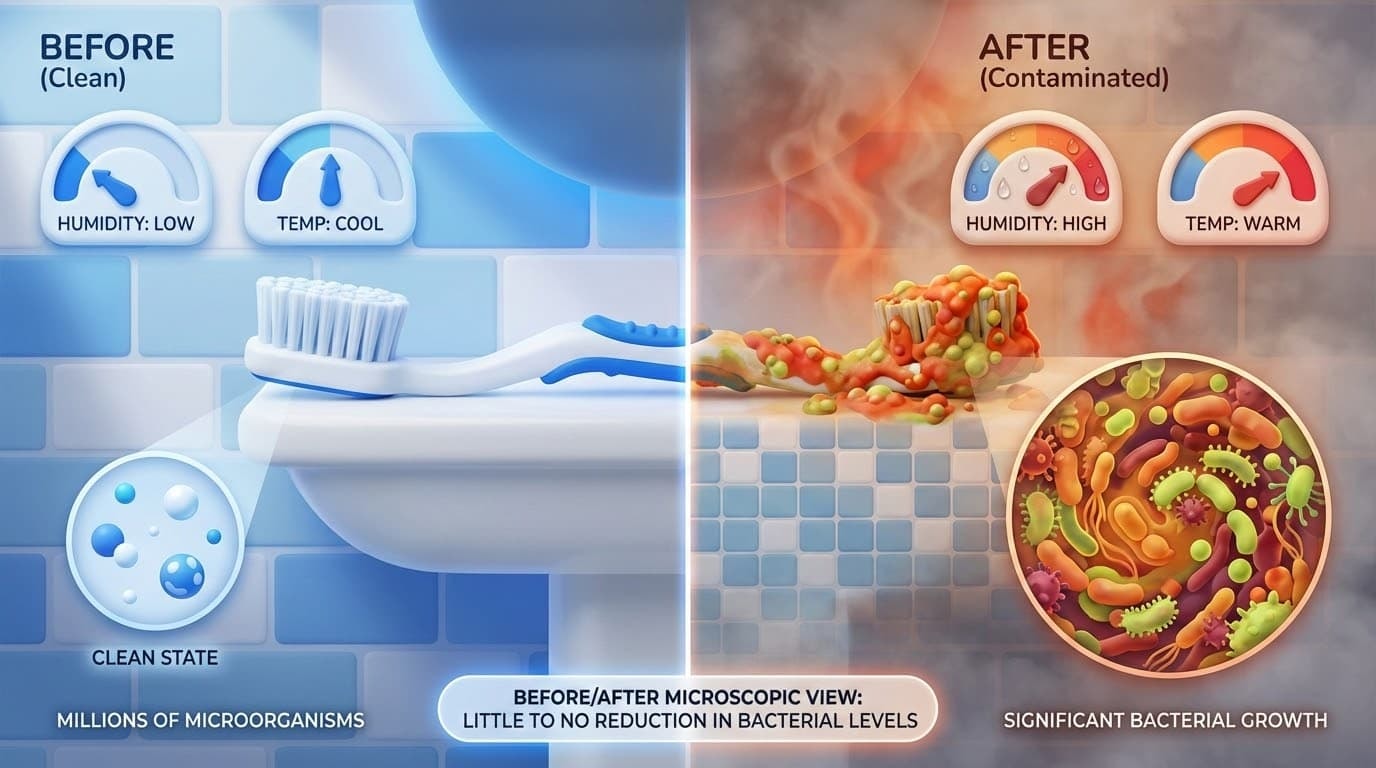
Every time you brush your teeth, saliva, food particles, and bacteria from your mouth get transferred onto the toothbrush bristles. In just a few days, those bristles can hold millions of microorganisms, including germs that cause tooth decay and gum infections.
2. Bathrooms Provide The Perfect Environment For Bacteria To Grow
Toothbrushes are usually stored in bathrooms, which are warm, humid, and often near toilets. That’s important because this kind of environment encourages bacterial growth. If your toothbrush is left uncovered, it’s even more likely to collect germs from the air, including tiny droplets released when you flush the toilet.
3. Tap Water Only Removes Surface Debris
Many people rinse their toothbrush with water after brushing and think that’s enough…but it isn’t. While rinsing does remove toothpaste and visible food debris, it doesn’t eliminate bacteria. Studies have shown that rinsing with water alone results in little to no reduction in bacterial levels on toothbrush bristles.
4. Microbial Contamination Is More Common Than You Think
A 2022 study found that toothbrushes used by hospital patients had high levels of bacterial contamination. Some even carried dangerous strains of bacteria that were resistant to antibiotics. Although home environments are less intense, similar risks apply if you don’t disinfect your brush regularly.
5. Germs Can Survive On Bristles For Days
If you’ve been sick with a cold, flu, or any kind of mouth infection, your toothbrush can continue to carry those germs long after your symptoms disappear. This increases the risk of reinfection or of spreading germs to others who share your bathroom.
6. Cross-Contamination Is A Real Risk In Shared Spaces
When multiple people store their toothbrushes close together, especially in the same holder, germs can spread from one brush to another. This is a bigger concern if someone in your home has a weakened immune system, such as after surgery or during illness.
7. Disinfection Improves Oral Hygiene
Regularly disinfecting your toothbrush helps reduce the number of harmful bacteria entering your mouth each time you brush. This can support better gum health, lower your risk of infections, and help you maintain a cleaner mouth overall.
8. It’s Not A Replacement, But A Smart Addition
Disinfecting your toothbrush doesn't replace brushing your teeth properly or visiting the dentist. And it doesn’t mean you can use the same toothbrush forever. You should still replace your toothbrush (or toothbrush head) every 3–4 months, especially if the bristles are worn or frayed. But disinfection adds an extra layer of protection between replacements.
Using a clean toothbrush is a small but powerful way to protect your oral health. Simple methods like soaking your toothbrush in 3% hydrogen peroxide once a week can significantly reduce harmful bacteria without damaging the bristles. For families, children, or anyone recovering from illness, this easy step helps ensure each brushing session starts with a truly clean tool.
How Does Hydrogen Peroxide Compare to UV and Vinegar Sanitizers?
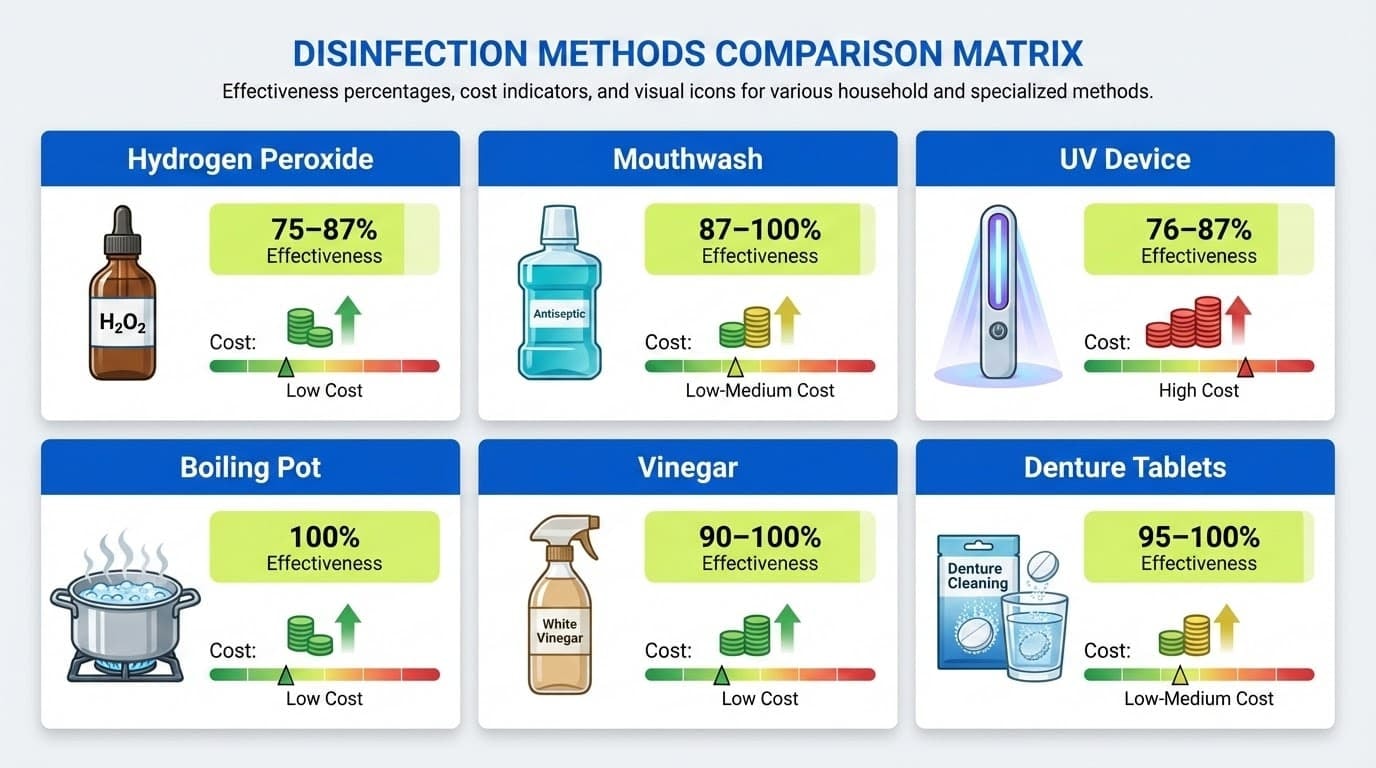
There’s no one-size-fits-all solution when it comes to disinfecting your toothbrush.
While hydrogen peroxide is one of the most accessible and effective methods, several other options might suit different needs, preferences, or budgets.
Comparing them side by side can help you make a more informed decision about what works best for your routine and household.
Each method has pros and cons depending on cost, ease of use, availability, and how well it actually removes harmful bacteria from your toothbrush bristles. Here’s how they stack up:

What Is the Correct Protocol for Soaking a Toothbrush?
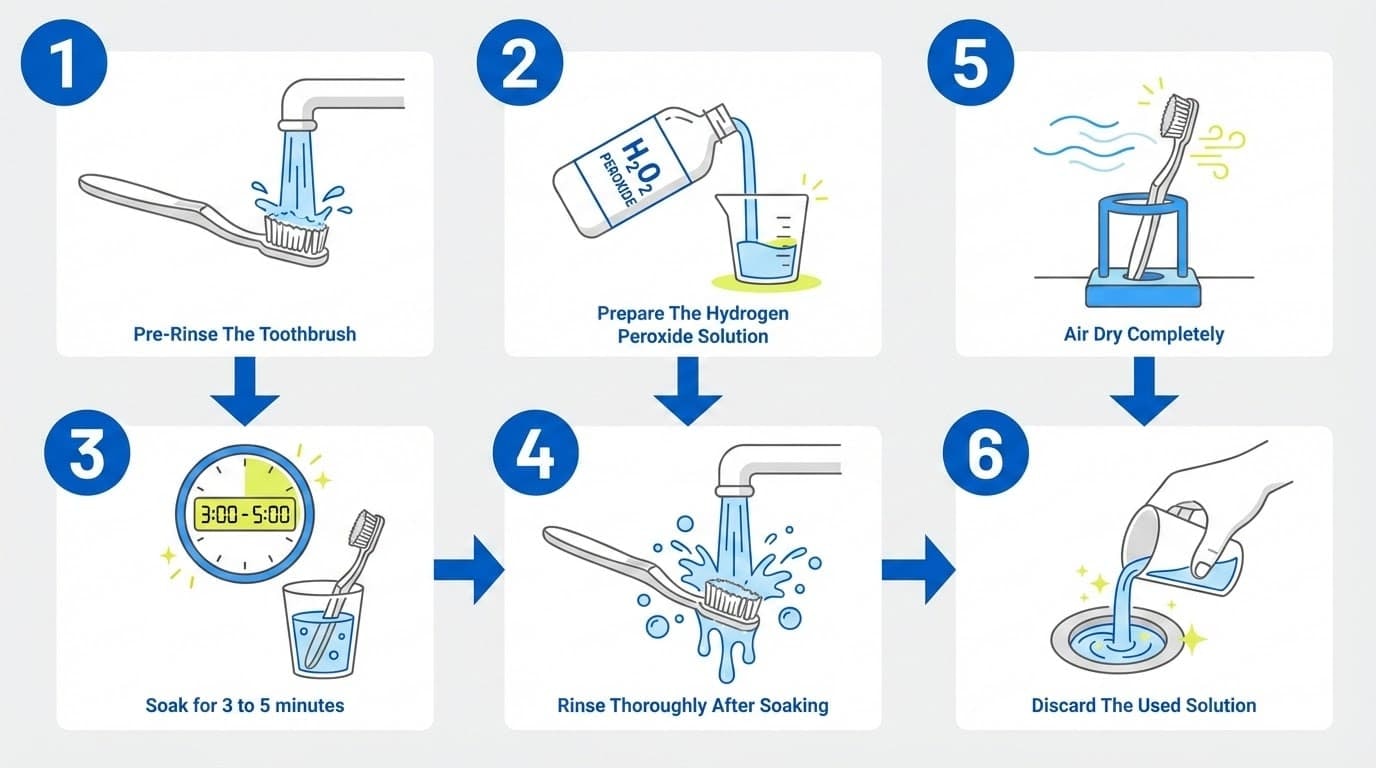
This simple method takes under 10 minutes and helps eliminate harmful bacteria from your toothbrush bristles. It supports better oral hygiene and keeps your brush in a safe, usable condition.
Step 1: Pre-Rinse The Toothbrush
Before soaking, rinse your toothbrush under warm running water. This removes food particles, leftover toothpaste, and saliva that can block disinfectants from reaching the bristles. Gently rub the bristles with your fingers to loosen any residue.
If you use an electric toothbrush, detach the brush head from the handle before rinsing to protect the motor and battery. Hot water works fine, but avoid boiling water as it can damage the toothbrush head.
If you use an electric brush daily, deep cleaning the brush head can improve performance.
SNOW’s LED Electric Toothbrush offers sonic technology for better plaque removal and features a whitening LED light to enhance your brushing. Perfect for daily use, and the detachable brush heads make it easy to clean thoroughly.
Get the SNOW LED Electric Toothbrush
Step 2: Prepare The Hydrogen Peroxide Solution
Pour standard 3% hydrogen peroxide into a clean cup or glass. You only need enough to fully cover the bristles. Use a fresh batch each time, as peroxide breaks down and becomes less effective when exposed to light and air.
If you have sensitive gums, mix hydrogen peroxide with water at a 1:1 ratio to create a 1.5% solution. Let your toothbrush soak longer (about 10 minutes) with the diluted mix for effective disinfection.
For users who whiten their teeth regularly, keeping their toothbrush clean is essential to avoid bacteria that could reduce whitening results.
SNOW’s DiamondSeries Whitening Kit includes advanced serums with enamel-supporting ingredients like hydroxyapatite and potassium nitrate, so pairing it with a clean toothbrush ensures optimal performance.
Get the SNOW DiamondSeries Whitening Kit
Step 3: Soak The Toothbrush Head
Place the toothbrush head into the peroxide solution, making sure only the bristles are submerged. Avoid soaking electric toothbrush handles to prevent internal damage.
Soak for 3 to 5 minutes for weekly cleaning. Soak for 15 to 20 minutes after illness (cold, flu, strep) or high exposure to germs.
During this time, hydrogen peroxide breaks down bacterial cells and helps remove microbial contamination from between the bristles.
If you frequently get sick or live in a shared space, it’s critical to disinfect properly.
SNOW Replacement Brush Heads make it easy to swap out worn bristles without needing a whole new brush. They’re designed to work with SNOW’s LED system and support healthier hygiene practices.
Step 4: Rinse Thoroughly After Soaking
After the soak, rinse the toothbrush under warm or cool running water for 10–15 seconds. This step is key to removing all hydrogen peroxide and preventing an unpleasant taste during brushing.
Gently squeeze the bristles while rinsing to remove any remaining solution inside the clusters. This helps preserve bristle strength and prevents irritation in your mouth.
If you struggle with lingering bad breath or stains, combining this routine with a mouthwash can amplify results.
SNOW’s Arctic Frost Whitening Mouthwash uses refreshing mint and stain-lifting ingredients for a clean, long-lasting finish after every brush.
Try SNOW Arctic Frost Mouthwash
Step 5: Air Dry Completely
After rinsing, shake off excess water and stand the toothbrush upright in a well-ventilated toothbrush holder. Make sure it dries completely before the subsequent use.
Avoid closed containers or travel caps when the brush is still wet. Moisture trapped in enclosed spaces promotes rapid bacterial regrowth.
If you travel often, keeping your toothbrush safe and dry on the go matters just as much.
SNOW’s Premium Toiletry Bag is water-resistant and thoughtfully designed to keep your toothbrush upright, dry, and away from contaminated surfaces.
Step 6: Discard The Used Solution
Once finished, pour the used hydrogen peroxide down the sink. Never reuse the exact solution for multiple soaks. It loses potency after one use and won’t effectively eliminate bacteria.
Always use a fresh batch next time to ensure adequate disinfection.
How Should You Modify Disinfection for Illness, Braces, or Kids?
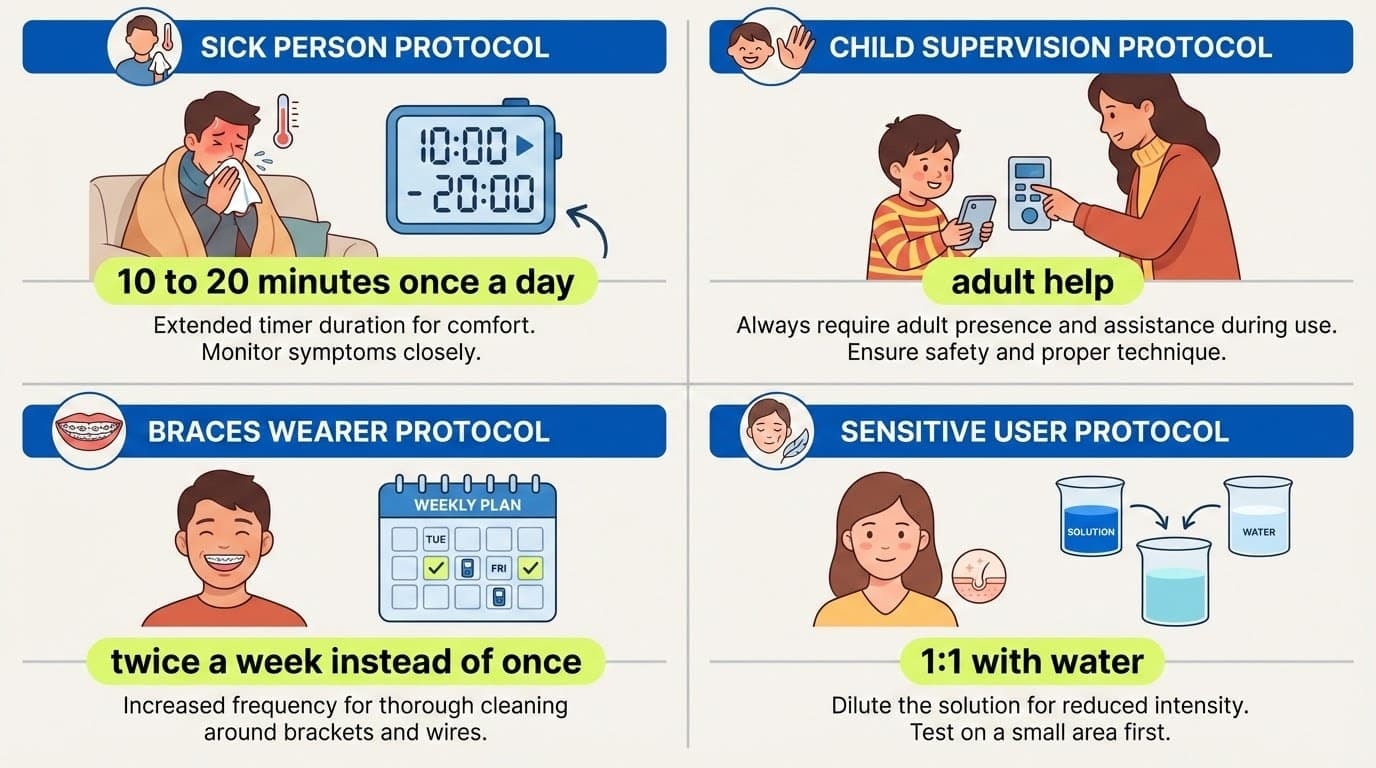
Not everyone’s oral hygiene routine is one-size-fits-all. If you’re sick, have braces, care for kids, or experience sensitivity, your toothbrush disinfection process may need a slight adjustment.
Here’s how to modify your steps while still keeping your toothbrush clean and safe to use.
If You're Sick or Recovering From an Illness
When you’re under the weather, your toothbrush can become microbially contaminated with harmful germs and viruses. During a cold, flu, or other illness, soak your toothbrush in hydrogen peroxide for 10 to 20 minutes once a day. This longer soak helps remove any bacteria or viruses that could cause reinfection.
Once you feel better, either return to your regular weekly soak schedule (3–5 minutes) or replace your toothbrush entirely if you had something serious like COVID-19 or strep throat. Always rinse thoroughly with warm water after soaking and let it air dry in an upright position.
SNOW TIP: Pair your clean brush with the SNOW® LED Whitening Electric Toothbrush for extra-effective brushing while you’re recovering. Its sonic technology gently cleans around sensitive gums and helps prevent the spread of germs on the brush head.
Get the SNOW LED Toothbrush Today
For Children and Younger Users
Kids need adult help when it comes to safely disinfecting toothbrushes. They should never handle hydrogen peroxide themselves. Parents can soak their child’s brush head in hydrogen peroxide for 3 to 5 minutes, rinse it thoroughly with warm water to remove any taste, and air-dry it before returning it to the toothbrush holder.
This quick step helps maintain good oral hygiene, especially since children often miss food particles and may not rinse their brushes as well as adults do.
SNOW TIP: Try the SNOW® Magic Whitening Toothpaste Booster Powder alongside your child’s toothpaste. It contains hydroxyapatite to support enamel and is gentle enough for family use.
Shop the Magic Booster Powder Now
If You Wear Braces or Orthodontic Appliances
Braces create many small areas where food debris and plaque can hide. If you wear braces, it’s smart to disinfect your toothbrush more often, aiming for twice a week instead of once.
Be extra careful to rinse away all hydrogen peroxide after soaking, so no residue gets trapped in your brackets. Stick to soaking only the brush head to avoid damaging your electric toothbrush or manual brush handle.
SNOW TIP: Use the SNOW® AquaJet® Pro Water Flosser between brushing sessions to clean those hard-to-reach places around braces. It blasts away food particles and supports better overall oral hygiene.
Upgrade your Braces Routine with SNOW AquaJet Pro
If You Have Sensitivity or Gum Irritation
Some users with sensitive gums or dry mouth might feel discomfort from full-strength hydrogen peroxide. You can still clean your toothbrush regularly by adjusting the formula. Try diluting the hydrogen peroxide 1:1 with water for a gentler solution, and soak your toothbrush for just 2–3 minutes.
If sensitivity persists, consider switching to a different method, such as soaking your brush in a denture-cleaning solution or using alcohol-free mouthwash.
How to Keep Your Toothbrush Clean Between Soaks
Keeping your toothbrush clean every day is just as important as soaking it weekly. These simple but effective habits help reduce bacteria buildup and maintain good oral hygiene.
Rinse Your Toothbrush Thoroughly
Use hot or warm water before and after each brushing session. Gently rub the bristles with clean fingers to loosen and remove toothpaste residue, food debris, and saliva. This helps prevent bacteria from clinging to leftover particles.
Store Your Brush Upright In A Well-Ventilated Space
Letting your toothbrush air dry completely between uses is essential. Keep it in a toothbrush holder that allows airflow. Avoid storing it in closed containers or travel caps when it's still wet, as these trap moisture and promote bacterial growth.
Prevent Cross-Contamination In Shared Bathrooms
If you live with others, ensure that toothbrushes don’t touch. Use different colors or labels to tell them apart. This prevents bacteria from spreading between brushes, especially during cold and flu season.
Keep It Away From The Toilet
Flushing with the lid open can release microscopic droplets into the air. To reduce contamination, keep your toothbrush holder as far away from the toilet as possible and always close the lid before flushing.
Clean Your Toothbrush Holder Regularly
Holders can collect grime over time. Every 1–2 weeks, wipe it down with a damp cloth soaked in mild soap or disinfectant. This ensures your clean brush isn’t sitting in a dirty container.
Final Thoughts
Keeping your toothbrush clean is more than just a good habit. When you give your brush sufficient time to soak, store it in a well-ventilated area, and replace the bristles when needed, you help protect your oral health every day.
Trusted sources like the Cleveland Clinic agree that no matter how long you soak your toothbrush, it still needs to be replaced regularly. Disinfection supports hygiene between changes but doesn’t replace the need for fresh bristles.
To truly level up your brushing routine, combine these daily habits with high-performing tools. It’s an easy, low-cost way to maintain a healthier mouth and reduce bacteria buildup near your toothbrush holder or bathroom sink.
Explore the SNOW Collection to find tools that fit your routine and help you get more from every brushing session. Whether you want to disinfect your toothbrush more effectively, improve oral hygiene, or enjoy a cleaner, brighter smile.
Explore the SNOW Collection Now
FAQs
Got questions? We’ve got clear answers to help you brush smarter and care better.
Can I leave my toothbrush in hydrogen peroxide overnight?
Overnight soaking is not recommended. Clinical evidence shows that antimicrobial effectiveness plateaus around 20–30 minutes, meaning more prolonged exposure doesn’t improve germ kill. However, extended contact significantly increases the risk of bristle degradation. Overnight soaking often results in soft, floppy bristles that don’t clean teeth effectively. Stick to the 3–20-minute range, depending on your needs.
Do I need to dilute 3% hydrogen peroxide before soaking my toothbrush?
You can use 3% hydrogen peroxide straight from the bottle for a standard 3–5 minute soak. Dilution is optional and mainly helpful for people who prefer a milder solution, particularly those with sensitive gums. If you dilute 1:1 with water (creating roughly 1.5% concentration), pair it with a slightly longer soak time of about 10 minutes to compensate for the reduced strength.
Is it okay to reuse the same hydrogen peroxide in the cup for multiple soaks?
No. Once a toothbrush has been soaked, the solution becomes contaminated with the very bacteria and debris you’re trying to eliminate. Reusing contaminated solution defeats the purpose and could actually introduce additional microbes. Always discard the used solution and pour a small amount of fresh solution each time you disinfect. A bottle of hydrogen peroxide costs very little and lasts for weeks of soaking sessions.
Can I use hydrogen peroxide on electric toothbrush heads?
Yes, you can usually soak just the removable brush head for the same 3–5 minute window. Remove the head from the handle and submerge only the bristle portion; never soak the handle or electronic components, as this can cause damage. Check your manufacturer’s care instructions to confirm this approach won’t void your warranty. Most major electric toothbrush brands explicitly allow this type of cleaning.
What should I do if I accidentally brush with a toothbrush that still tastes like hydrogen peroxide?
Stop brushing immediately and rinse your mouth thoroughly with water. Then rinse the brush again under running water for 10–15 seconds, ensuring all residue is removed. A slight taste is unlikely to cause harm with a 3% concentration, but persistent irritation or concerns about ingestion warrant contacting a healthcare provider. Going forward, add a more thorough rinse step to your routine to prevent reinfection.
Does hydrogen peroxide remove toothbrush yellowing?
Yes, hydrogen peroxide acts as a mild bleaching agent. A 3-5 minute soak can oxidize stains from coffee or food on the bristles and plastic head, restoring the brush's appearance while disinfecting.
Can I mix baking soda with hydrogen peroxide for soaking?
Combining baking soda with hydrogen peroxide creates a foaming paste that is excellent for mechanical scrubbing but less effective for passive soaking. For a soak, pure 3% hydrogen peroxide is preferred to ensure the liquid penetrates deep into the bristle tufts.
Will hydrogen peroxide damage the rubber gum stimulators on my brush?
Prolonged exposure (over 30 minutes) can cause rubber elements to become brittle. Stick to the 3-5 minute limit to preserve both nylon bristles and silicone gum massagers.


